
A multimeter can help separate a power, cable or connection problem from a fault that needs a repair bench. Use the meter only within its rated limits and follow the device and meter instructions. This guide covers checks that may be useful for low-voltage phone work; it does not confirm that every model or meter supports every test.
This guide walks through those tests in the order a repair bench would run them, with the safety rules that keep a delicate device from becoming a parts donor. It also covers which meter features matter for phone work, how to read the display’s odd symbols, what meters cost in South Africa, and where DIY diagnosis should stop.
This guide is written specifically for phone repair — which meter features matter on a phone board and how to use them to find charging, battery and flex faults — while the basics of voltage, resistance and continuity for any electronics are covered in the beginner guide to using a multimeter.
Phone symptoms lie. A phone that will not charge could have a dead adapter, a broken cable, a clogged or damaged port, a worn battery, or a failed charging chip — and the screen shows the same frustrated battery icon in every case. A phone that will not turn on might be deeply discharged, locked out by a protective circuit, or carrying real board damage. From the outside, all of those look identical.
A digital multimeter translates that guesswork into numbers. It measures voltage (the electrical pressure between two points), continuity (whether a conductive path exists), resistance, and on most models the forward voltage of diodes. Those readings map neatly onto the three layers every phone power system has: sources (battery and charger), paths (cables, flexes, connectors) and the loads on the board. Find the layer that fails and you know what to fix, what to replace, and what to stop poking.
Phone work does not demand an expensive industrial meter, but it does demand four specific functions. Check the dial before you buy:
Skip meters that only read AC mains voltage, and treat current-measurement ranges as a bonus rather than a requirement — measuring current means breaking the circuit, which is fiddly and rarely necessary here. If you already own a meter and want a slower start, the beginner’s guide to using a multimeter covers the dial and the probe jacks step by step.
A multimeter is gentle around phone circuits, but four habits keep it that way:
One South African note: load shedding means the grid here surges and snaps more often than most. When power returns after an outage, give the socket a moment before plugging in a charger, because restoration spikes are exactly what surge protectors exist for — and fragile charger electronics are usually the first casualties.
Set the meter to DC volts on a 20-volt range, hold the red probe on the battery’s positive terminal and the black probe on the negative terminal, and read the display. A healthy lithium-ion phone battery measures between about 3.7 and 4.2 volts depending on its charge: 4.2 volts is a full pack, and roughly 3.7 volts is the nominal rating. That is the whole test.
Low readings tell their own story. A pack measuring well under 3 volts has been drained deep, and phone protection circuits usually lock such a pack out until it is gently woken on proper equipment. A pack at or near zero volts may never recover safely — cells discharged below 2 volts suffer permanent internal damage, which is why a deeply flattened battery is normally replaced rather than revived.
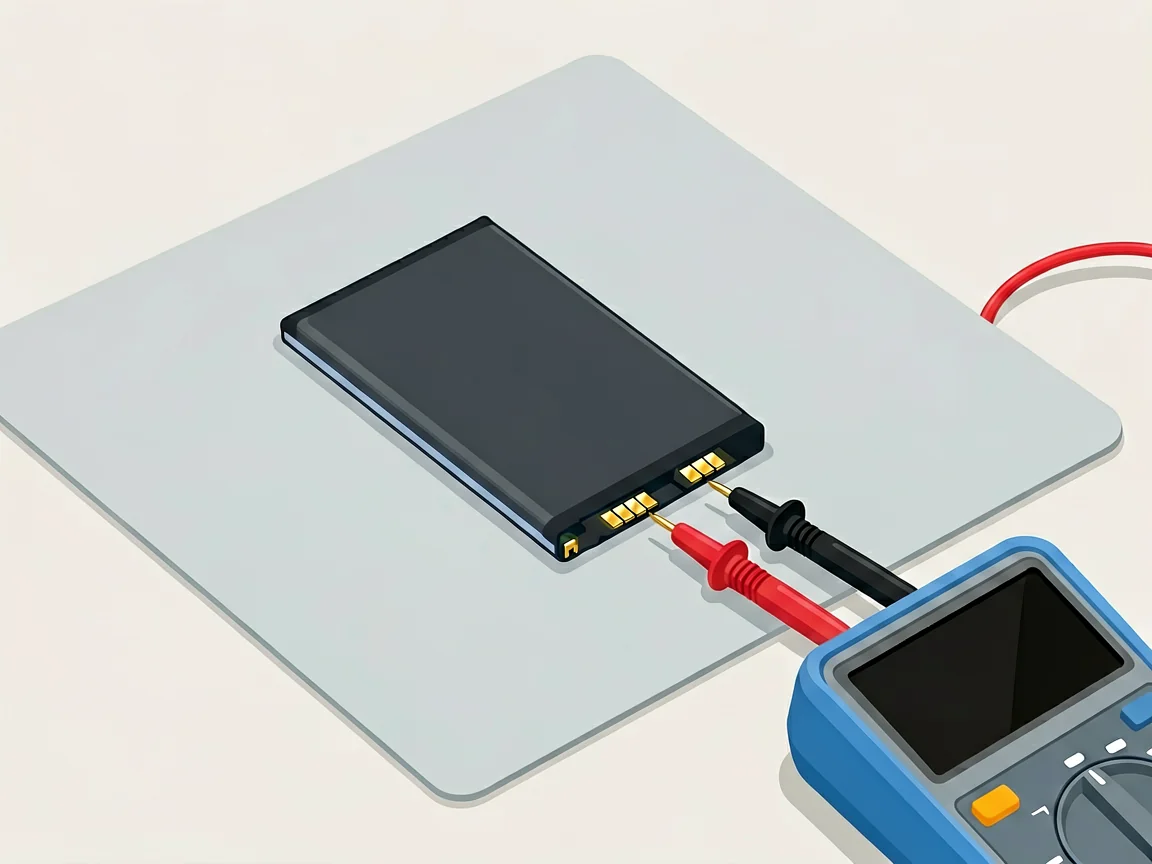
One caution: voltage proves charge, not health. Lithium batteries hold a nearly flat voltage across most of their discharge, which is exactly why a worn-out pack can read a convincing 3.8 volts and still die by lunchtime. Use the voltage test to sort “empty or dead” from “charged”, not to judge capacity. The classic signs of a tired battery are different: fast drain, sudden shutdowns at 20 or 30 percent, and any swelling. And if you are ever offered a second-hand pack at a market stall or on a classifieds listing, run this exact test before money changes hands: a pack reading under 3 volts has been stored flat, and flat-stored packs rarely last.
Start with the wall adapter, because it is the cheapest link in the chain and the first thing load shedding breaks. Set the meter to DC volts on the 20-volt range, plug the adapter into the wall, and rest the red probe tip on one outer metal contact of its USB-A socket and the black probe tip on the other. A healthy charger reads close to 5 volts, because USB power delivers a nominal 5 volts on its standard supply pin — exactly what phone charging circuits expect to see.

USB-C complicates the picture on purpose. Modern USB-C chargers negotiate their voltage with the phone over a dedicated channel, so an idle USB-C port can legitimately show zero volts on a meter — that reading alone does not prove the charger is dead. Test older USB-A adapters directly; for USB-C, judge the charger by whether a known-good phone charges from it, and spend your probe time on the cable instead.
If the adapter checks out, the usual culprit is the cable, then the phone’s own socket. Lint packs into charging ports surprisingly tightly — a wooden toothpick, never a pin, clears most blockages. If the port itself is damaged or the phone still refuses to charge on a verified-good adapter and cable, the fault sits deeper: our guide to a phone charging port not working walks through that diagnosis step by step.
Continuity is the beep test: with the circuit unpowered, a steady beep means the path is continuous, and silence — or a reading stuck on OL — means it is broken. The full step-by-step version is in the beginner guide to using a multimeter.
That technique, called buzzing out a circuit, is how you find the cable that looks fine but isn’t. Probe both ends of each conductor in a charging cable while wiggling the strain reliefs; an intermittent break shows itself as a beep that comes and goes. The same trick works inside the phone: a flex cable’s pin and its destination connector should beep through. De-energise first — unplug the charger, and disconnect the battery before touching anything internal.
Along the KwaZulu-Natal coast and through Cape Town’s damp winters, corrosion is the quiet killer. Salt-laden air creeps into connectors and oxidises the contacts until resistance creeps up and the connection drops out, long before anything looks visibly rusty. Continuity mode catches these opens and near-opens, and a minute of probing tells you whether a clean-and-reseat will do or the flex must be replaced.
Diode mode reads the forward voltage drop of a semiconductor junction — roughly 0.6 to 0.7 volts across a silicon diode is the number a healthy junction shows. Its phone-repair value is less about diodes themselves and more about power rails: with the battery disconnected, probing between a power rail and ground should show a junction-like reading, while a rail stuck near zero volts in both probe directions points to a shorted component somewhere on that line.
This is also where a DIY diagnosis should stop. Identifying exactly which chip is shorted takes schematics, board views and hot-air rework — bench work for a workshop, not a first probe session. The meter’s job here is triage: if a rail is shorted, no battery, cable or port swap will fix the phone, and you have just saved yourself from buying parts it does not need. A phone whose battery and charger both test clean but still will not start belongs with a professional — our guide to a phone that won’t turn on covers what to do first and what a workshop will check.
A few display quirks confuse everyone at first:
If a reading looks impossible, test the meter itself: switch to continuity mode and touch the tips together. No beep means a flat meter battery, a broken lead or a blown fuse — the suspect is the meter, not the phone.
Prices vary by model, included functions, seller and delivery terms. Compare the current product page and its stated specifications instead of relying on a fixed market range; the current POTATOTECH listing is one product example, not a market benchmark.
Check the included leads and accessories on the product page. If the listing does not state what is included, confirm it before ordering.
A repair bench may charge for diagnosis or repair, and prices vary by provider and fault. Use the multimeter to gather information only within your skill level, then compare the relevant product page or contact a qualified repairer before buying replacement parts. Browse the repair tools range to compare current options.
Look for the functions your repair requires, then verify the exact ranges, lead sockets and included accessories on the product page or in the meter manual. A current listing is not a guarantee that every model has the same functions.
Set DC volts on the 20-volt range, red probe on the positive terminal, black on the negative. A healthy lithium-ion pack reads roughly 3.7 to 4.2 volts. Far below 3 volts means deeply discharged; near zero usually means the pack is finished. Never probe a swollen battery.
Charging ports and adapters can behave differently across USB types and devices. Do not treat one voltage reading as a universal pass/fail result; follow the device and meter instructions, and stop if the test points or limits are unclear.
Overload or open line. The reading is outside the selected range, or there is no electrical path between the probes. On a continuity test, OL is what a broken circuit looks like.
Use the meter only within its rated limits and keep the probe tips separated. Power must be off for continuity and resistance tests; if you are unsure about a live-circuit measurement, stop and seek qualified help.
Prices vary by model, included functions, seller and delivery terms. Check the current product page for the item you are considering rather than relying on a fixed price range.
Related products: Digital Multimeter
Discrepancy notice: prices, specifications and repair procedures change without notice and can vary by device, province and situation. Voltage figures and battery behaviour described here reflect public technical references current at publication; verify critical details against your own device’s documentation before acting on them. Questions or corrections are welcome via our Contact page.
Samsung Galaxy A14 screen replacement in South Africa: part prices, the 4G versus 5G model trap, why no OLED exists for this phone, and honest DIY difficulty.
Samsung Galaxy A05 screen replacement in South Africa: part prices, the A05s and A06 model traps, with-frame versus bare panel, and the honest DIY difficulty.

Compare Samsung Galaxy A-series screen part prices in South Africa, understand what changes the fitted repair cost, and check your exact model before ordering.
2 responses