
How to use a multimeter for beginners is mostly about learning three tests. A digital multimeter measures AC/DC voltage, current, and resistance, and its continuity mode beeps when a circuit path is complete. The beginner basics are simple — black probe in COM and red probe in VΩ for voltage and resistance; measure voltage in parallel (circuit live); and measure resistance and continuity with power off. Master those three moves and you can answer the questions that matter in electronics repair: is the battery dead, is this cable broken, and is this wire live?
For phone, laptop and general electronics work, the four functions you’ll actually use are DC voltage, AC voltage, resistance and continuity.
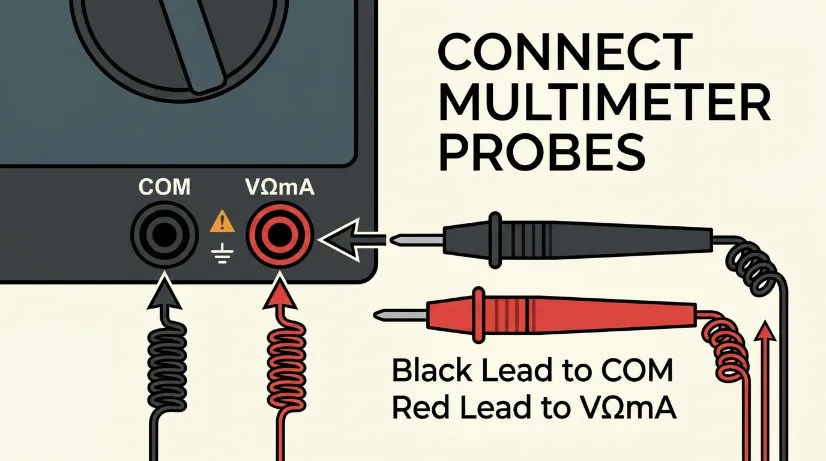
Getting the probes wrong is how beginners blow fuses – or worse:
Before every test: inspect the leads for cracked insulation or exposed copper, confirm the dial is on the right function, and confirm the red lead is in the right socket. The official UNI-T safety guide walks through these checks step by step, and it’s worth a read before your first live measurement.
Set the dial to V⎓ (DC), choose a range above the expected voltage (a 9V battery → the 20V range), put the red probe to ‘+’, and the black to ‘−’. A healthy 9V battery reads close to 9V; a flat one reads well below. This is the single most useful test when a device “just won’t power on” — and it’s how you can tell a dead phone battery from a charging problem before you buy anything.
Power everything off. Set the dial to continuity (beep mode) and touch the probes to both ends of the cable. Beep = the path is complete; silence = a broken conductor inside. Perfect for testing suspect USB or charging cables before you blame the phone — it’s a two-second check that saves you from replacing a perfectly good port.
If your meter has NCV (non-contact voltage detection), hold the meter near a wire or socket, and it will sense an AC field without touching the copper — handy as a first “Is this live?” check before you touch anything. It’s a safety aid, not a replacement for proper testing. On a meter with NCV, the sensor sits near the top of the case, and the beep/LED intensity rises as you get closer to a live conductor.
If the task involves live mains wiring you’re not confident about, call a qualified electrician — a multimeter doesn’t make you one.

For beginners, the three practical checks are DC voltage, continuity and resistance. Keep the circuit powered for voltage tests, switch power off before resistance or continuity tests, and compare the reading with the component or cable specification. When you are ready to choose an electronic tool, compare our Digital Multimeter and Test & Measurement Tools.
For repair bench and home use, look for the following:
For a repair bench, choose a meter that supports AC/DC voltage, resistance, continuity and the current range you actually need; NCV and data hold can be useful extras. Confirm the current product specifications, price and stock on the product page or with support before buying. Always select the correct range and mode, use suitable test leads, and never use a meter beyond its rated category or limits.
How do I measure voltage with a multimeter?
Black probe in COM, red probe in VΩ, set the dial to V⎓ (DC) or V~ (AC), choose a range above the expected value, and touch the probes across the two points in parallel. The circuit can be powered on for voltage.
What does continuity mode do?
It beeps when there’s a complete electrical path between the probes. Use it (with the power off) to check if a cable, fuse or connection is intact — a beep means good, and silence means a break.
What is NCV on a multimeter?
Non-contact voltage detection — the meter senses an AC electric field near a live wire or socket without touching the copper. It’s a quick safety check, not a substitute for proper testing.
Where do the probes go?
Black is always in COM. Red in VΩ for voltage, resistance and continuity; red in the A socket only for current. Using the current socket to measure voltage can damage the meter and create a safety hazard.
Is a multimeter safe for a beginner?
Yes, for battery and low-voltage checks. Always inspect the leads, start on the highest range, power off for resistance/continuity, and never exceed the meter’s rated limits. Leave uncertain mains work to a qualified electrician.
Discrepancy Notice: Our online shop is still under preparation. Product prices, availability and shipping options are subject to change. This article is for informational purposes only — please see our Contact page for the latest information.

You tap an app and nothing happens for ten seconds, then the whole screen freezes mid-animation. You wait, you tap again, the phone buzzes once and sits there. Sometimes a restart clears it for a day, sometimes it freezes again as soon as you open WhatsApp, and sometimes it started after an update or when […]

You open Maps or your taxi-hailing app, and the blue dot never settles, or it places you three streets away. You stand outside with a clear sky above you, and the phone still takes minutes to lock on, or it locks on and then drops your position into the middle of a field. Sometimes the […]
You pick up the phone to take a voice note or make a call, tap the record button, and the waveform stays flat. You speak louder, move your mouth closer to the bottom of the screen, and still nothing registers. Sometimes the microphone works in the camera app but not on a call; sometimes it […]
6 responses