
How to Solder for Beginners: 5 Safety Rules First

How to solder for beginners is simpler than it looks: soldering joins two electronic parts by melting a metal alloy — solder — around the connection. The recipe is a soldering iron, 60/40 rosin-core solder, and the right temperature (around 300–360°C for leaded solder), and you can make a clean joint in 2–3 seconds. The solder wire you choose matters more than most guides admit — rosin-core solder has flux built into the wire, which is what makes it flow and bond. And before you switch anything on, learn the five safety rules: a soldering iron tip reaches 300–400°C and will burn you or start a fire if you treat it carelessly.

A soldered connection is permanent and electrically reliable — and it’s a skill you can pick up in an hour or two of practice.
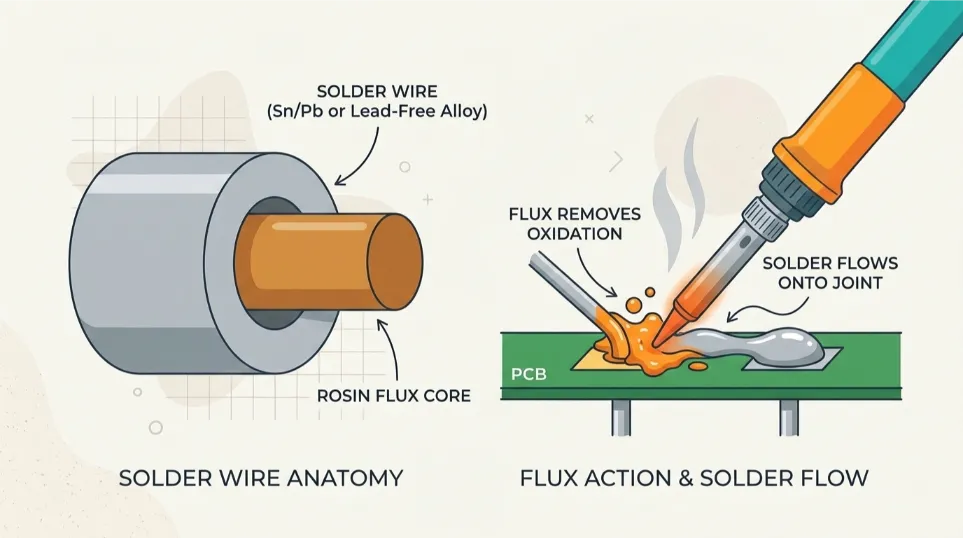
Diagram of solder wire anatomy showing the rosin flux core inside the wire and how it flows onto a joint

How to solder for beginners: what you need to start

The bare minimum is short:

  • A soldering iron — for most electronics, a basic iron in the 25–40W range is fine to learn on. (If your iron has no temperature control, keep in mind that temperature-sensitive work will be harder — a controlled station is better for that.)
  • Rosin-core solder — 60/40 (60% tin, 40% lead) is the classic, forgiving choice; 63/37 is a step more predictable. Lead-free solder exists but needs higher heat and is less beginner-friendly.
  • A tip cleaner — brass wool is gentler than a wet sponge (which cools the tip and cracks the plating over time).
  • A stand for the hot iron and good ventilation.

You don’t need a fancy station to begin. A pen-style iron in the 15–40W range and a small roll of 60/40 rosin-core solder will get you through your first joints.

Picking your solder: what the numbers mean

Solder wire has a core of flux — a chemical that removes oxidation and helps molten solder “wet” the surfaces so it bonds instead of balling up. That’s why you buy rosin-core or flux-core solder, not bare wire.

Two practical points:
  • Buy.60/40 tin-lead is what most beginners learn on: it melts at about 190°C, flows well, and makes shiny joints. It does contain lead, so wash your hands afterwards and don’t eat at the bench. Also check that your application allows tin-lead solder before you buy.
  • work. Diameter matters — 0.8–1.0 mm is the sweet spot for most through-hole and general work. Our Supa Brite 60/40 solder (1.0mm) and the 50g flux-core roll are sized for exactly this kind of work.
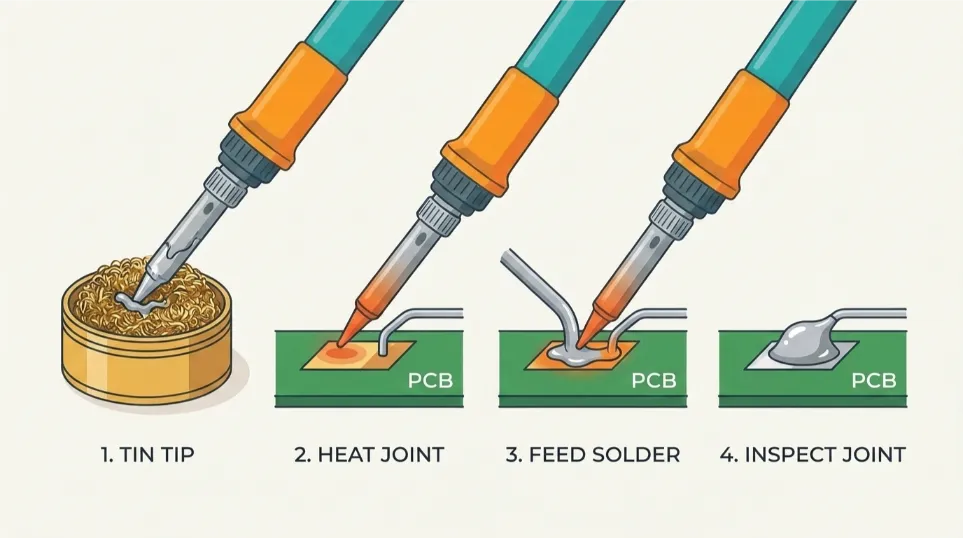
tin the tip, heat the pad and lead, feed solder into the joint, inspect the shiny result

The right temperature and technique

else: Temperature gets beginners into trouble more than anything else:

  • joints. Leaded (60/40): set the iron around 300–360°C — 340°C is a good starting point for general work. Too hot burns the flux; too cold makes lumpy grey joints.
  • forgiving. Lead-free: needs more heat, roughly 360–400°C, and is less forgiving.
  • heat. The goal: a clean joint in 2–3 seconds. If you’re pressing for 10 seconds and the solder is still lumpy, the problem is a dirty tip or not enough flux — not more heat.

attempt. The technique, in one sentence: heat the joint (pad + lead) and then feed solder into the joint — don’t melt solder on the tip and carry it over. iFixit’s own guide walks through the exact steps for making and inspecting a good joint, and it’s worth reading before your first attempt.

doesn’t. Keep the tip tinned: after every few joints, wipe it in brass wool and touch a little fresh solder to it. A silver-grey, shiny tip transfers heat instantly; a black crusty one doesn’t.

5 safety rules for beginners

Careless: This section is not optional — a soldering iron is genuinely dangerous if you’re careless:

  1. bench. bench. Always use the stand. The tip reaches 300–400°C — it will instantly burn skin and ignite paper, fabric and plastic. Never leave a hot iron unattended, and never put it down on the bench.
  2. Fan. Ventilate. The smoke from soldering is mostly flux and is an irritant — keep your head to the side, not above, and work near an open window or a fan.
  3. workbench. workbench. Wash your hands after using leaded solder, and don’t eat at your workbench.
  4. circuit. circuit. Never use acid-core solder on electronics — it’s for plumbing and will corrode your circuit.
  5. way. way. Unplug when done. Pull the plug, let the iron cool in its stand, and keep the cord out of the way.

Learning. Learning. Science Buddies’ soldering primer covers the same safety points and the equipment list in detail — a good second read while you’re learning.

Mistakes you’ll make (and how to fix them)

  • heat. heat. Cold joints (grey, lumpy solder that won’t bond): reheat with fresh flux; usually a dirty tip or too-low heat.
  • away, away. Too much solder / bridges: use desoldering braid — press it over the joint, heat from above, and it wicks the solder away.
  • seconds. seconds. Lifted pads: usually from pressing too hard or overheating a board beyond ~10 seconds.

heat. Every repairer makes these; the fix is practice, a clean tip, and the right heat.
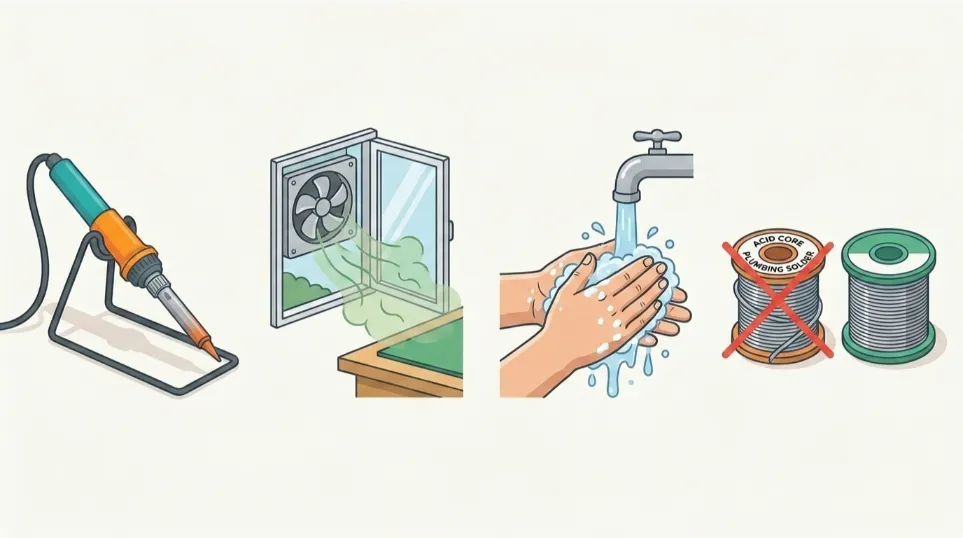
hot iron in stand, ventilation, wash hands after leaded solder, never acid core solder on electronics

Getting started in South Africa

Everything you need for a first session is available locally:

  • writing). Electric Soldering Iron 220-240V — pointed tip for controlled joints, anti-slip handle, works on standard SA mains (around R149 at the time of writing).
  • learning. Supa Brite 60/40 Rosin Core Solder Wire 200g (R579) — the 1.0 mm roll for regular bench use, or the 50 g flux-core roll (R489) for occasional repairs and learning.
  • Browse the soldering supplies category for the full range.

Prices can change — check the product pages for the current figures. And once your joints start coming out shiny, a multimeter is the natural next tool to verify your work.

FAQ

beginners. What temperature should I solder at?
For 60/40 leaded solder, around 300–360°C — 340°C is a good starting point. Lead-free solder needs roughly 360–400°C and is less forgiving for beginners.

Is 60/40 rosin-core solder right for beginners?
Yes — it’s the classic choice: melts at about 190°C, flows well and produces shiny joints. The rosin core contains flux, so you don’t need a separate flux pen for basic work. Wash your hands after use and confirm your application allows tin-lead solder.

Can I use any soldering iron?
For learning, a basic 25–40W pen-style iron works. If it has no temperature control, stick to simple jobs; temperature-sensitive work is much easier with a controlled station.

Why does my solder ball up instead of sticking?
Usually a dirty tip, not enough heat, or no flux. Clean the tip in brass wool, tin it with fresh solder, and make sure you’re using rosin-core (not acid-core) solder.

Do I need ventilation to solder?
Yes. The smoke is mostly flux and is an irritant — work near an open window or a fan, keep your head to the side, and never inhale it directly.

Related Guides


Discrepancy Notice: Our online shop is still under preparation. Product prices, availability and shipping options are subject to change. This article is for informational purposes only — please see our Contact page for the latest information.

Related reading: What Tools Do You Need to Repair a Phone? · How to Choose a Soldering Iron

Sources

About This Guide

POTATOTECH publishes research-based guidance on electronics repair, replacement parts, tools and device compatibility for South African users. Our content may reference manufacturer documentation, product specifications, technical repair resources and South African market information where relevant. Where POTATOTECH has not independently tested a product or repair method, researched information is not presented as first-hand testing. About POTATOTECH: /about-us/

Important

POTATOTECH provides information about replacement parts, repair tools and device compatibility. POTATOTECH is not affiliated with or endorsed by device manufacturers unless explicitly stated. Product names, trademarks and brands belong to their respective owners. Compatibility information is provided as guidance. Always confirm the exact device model, model number and relevant part specifications before selecting or purchasing a replacement part. Repair information is provided for general informational purposes. Follow manufacturer guidance and appropriate safety precautions when carrying out repairs.

Related Articles

How to Remove a Phone Screen Without Breaking It: The Right Temperature and Tools (South Africa 2026)

How to Remove a Phone Screen Without Breaking It: The Right Temperature and Tools (South Africa 2026)

Most cracked phone panels don’t come from a shaky hand. They come from the wrong temperature. Heat the adhesive too little and the glass fights you until it snaps. Heat it too much, or in one spot, and you cook the panel underneath instead — which is how “repair” turns into “replace”. This guide is […]

Phone Keeps Freezing? Causes and Fixes for South African Phones (2026)

Phone Keeps Freezing? Causes and Fixes for South African Phones (2026)

You tap an app and nothing happens for ten seconds, then the whole screen freezes mid-animation. You wait, you tap again, the phone buzzes once and sits there. Sometimes a restart clears it for a day, sometimes it freezes again as soon as you open WhatsApp, and sometimes it started after an update or when […]

Phone GPS Not Working? Causes and Fixes for South African Phones (2026)

Phone GPS Not Working? Causes and Fixes for South African Phones (2026)

You open Maps or your taxi-hailing app, and the blue dot never settles, or it places you three streets away. You stand outside with a clear sky above you, and the phone still takes minutes to lock on, or it locks on and then drops your position into the middle of a field. Sometimes the […]